Found on Pinterest – Artists Synchroblog

Pinterest kind of reminds me of YouTube – there’s lots of oddball stuff, and you can do almost any kind of obscure search and find something.

So it wasn’t really a surprise when I recently did a search for “white board ideas” and found dozens of diy applications.

While working on MAGazine, my white board was my best friend – all of the various sections and articles got listed, and it was easy to add and subtract notes as I thought of new ideas, or finished working on a page. Unfortunately though the one I was using was old and heavy and had a nasty habit of crashing to the floor. Eventually the poor thing was so completely bent out of shape that it wouldn’t stay on the wall.

Knowing that buying the same type would only end up with the same problem, I was happy to find a peel and stick version from Martha Stewart at Staples. Three 12×12 inch squares now form a customized wall next to my computer. The package contained 4 squares, and the last one wouldn’t fit my space. I didn’t know what to do with it, but didn’t want to throw it out.

Then a few weeks ago, while organizing myself for my class in Haliburton, I saw this white board backed iPad case on Pinterest. (Original source.)

That inspired me to take my spare square with me and use it as a portable and reuseable sketching space when I’m explaining things to my students. It worked brilliantly:

White Board

Because I was able to draw out a much larger-than-life version of the vernier calliper, teaching this segment was a breeze compared to what it’s been like in the past. The students were able to see exactly what I was referring to, and as a result were able to instantly use the calliper for their project. Since I don’t always have access to a blackboard or chalk, it was a perfect tool for sitting with students and helping them work out design problems.

This is definitely forming a permanent part of my teaching kit from now on!

The Artists Synchroblog is a group of bloggers who post every other month on the same topic, sharing our experience or perspective. On alternate months we undertake a Pinterest Project where we each take inspiration from a Pinterest picture, create something (art, a meal, a DIY project, etc) and then post about it.  You can read more about the Artists Synchroblog here.

Please visit the other synchrobloggers this month and read their Pinterest inspirations!

http://amyestellemetalworks.blogspot.com/
http://www.islandgirlsinsights.blogspot.ca/
https://www.diannekargbaron.com/blog
www.elenorbuffington.blogspot.com
http://doxallodesigns.blogspot.com/
http://www.journeyinjewelry.com/blog/My-Journey-in-Jewelry
http://simpledesignjewelry.blogspot.com/
http://designsbylynnea.blogspot.com/
http://marikach.blogspot.com/
www.createrecklessly.com
http://design.kcjewelbox.com/
www.allwiredupjewelrydesigns.blogspot.com
http://shaktipajdesigns.com/blog/
www.beadsbythebay.blogspot.com

I have no shame, we all start somewhere…

As a follow-up to my rant, I thought I should post a photo of some of my earliest work.  When I’m teaching raw beginners, I always suggest that they should keep their first pieces, so that years from now they’ll be able to see how far they’ve come.  I have a box full of my early pieces.  Most are completely unsellable, and some are butt ugly, but I remember being so proud of them when they were first made.

DianneEarlyJewellery

Some years later, I was dating a accountant who collected Inuit and Native art, and had a taste for the finer things in life:  Cuban cigars, $50/shot whiskey and Angus beef.  He had a very discerning eye, and was very willing to tell me when the work I produced did not show “The Spark of Divine Madness”, as he called it.  His criticisms, though sometimes really hard to hear, helped me to gain an understanding of where I needed to improve.

Outside of a formalized education environment, there are very few opportunites to get truly constructive feedback.  It’s frustrating to submit your work to a show or a publication and have it rejected without any explanation.  It shakes the ego, and it’s hard not to question every aspect of what you do as a result.  Is my work no good, did I not take good photos, was my artist statement crap? What??

The International Guild of Wire Jewelry Artists recognized the need for this type of mentoring, and set up a special section on their message board specifically for honest critique.  It’s sometimes a challenge to suspend attachment to the piece being critiqued; it helps to know that the observations are made with open hearts in the true spirit of helping each other improve.  I’ve used it myself and gotten immensely valuable commentary.

Alot of the energy behind my rant stemmed from knowing the impact on newbies when they learn the proper foundation skills.  The ability to create quality workmanship results in a corresponding increase in confidence and self-esteem.

Because wirework is perceived as being easy to do, special attention needs to be given to helping the public and the makers understand the importance of learning the right skills the right way.  As the full-time students who took my class found out, working with wire can require a high degree of dexterity, even for “simple” projects.  Many of them found it much more challenging than they expected.

Several people who responded to the discussion on one of the forums asked for further information about wire control.  I’m in the process of working something up and will publish it when it’s ready.

Almost 15 years ago, I started with these bits.  They are my reminder that we all start somewhere. Where we end up depends on a combination of our own drive and the support of those around us.

(Thanks to George, wherever he is, and to Karen and Jennifer.  And special thanks to Jacqueline, who at age 5, crawled up on my lap, and while fiddling with the pendant on the leather cord above, said “Y’know, I knew I was going to like you the moment I met you.”  When asked why, she said quietly:  “Because you make great jewellery!”)

A Rant about Quality & Best Practices

Bang Head Here

For at least a decade now there has been a very concerted effort to bring wirework into the mainstream consciousness.  Many people have dedicated a lot of time and effort to raising the profile of wire – and specifically solderless wire – as a legitimate medium for fine craft.

Thanks to the efforts of these people, and the influence of the Internet, wire artists have been able to show their work, and to connect with each other to share their passion for this form of metalworking.

In recent months I’ve noticed a change in attitude even amongst seasoned metalsmiths.  Where previously wirework was written off as not worthy of consideration, I’m seeing it given more prominence.  For example, The Metal Arts Guild of Canada – the Canadian equivalent of SNAG – is currently featuring the work of Sarah Williamson on the front page of its website*.  Sarah incorporates a lot of Rainbow Wrapping into her pieces.  In MAGC’s recent exhibition, not only my work, but also the wirework of Tamara Kronis, Lissa Brunet and Gillian Batcher figured prominently.

I see genuine interest light up in the eyes of people who ask me what I do, instead of watching them turning away and copping an attitude of “Oh… you don’t make “real” jewellery.”

Unlike 10 years ago, information on making wire jewellery is easy to find.

All of these developments are very positive.

Anyone who has followed this blog for any length of time knows that I am committed to producing quality work.  Anyone who has taken a class with me, or who has bought one of my tutorials knows that my commitment to quality also extends to my teaching.  One of the most treasured compliments I’ve ever gotten came from a Professor at George Brown College who taught the full-time jewellery program’s first year courses.  She greeted me one day while I was setting up for my class, and said that she had “heard good things” about my course.  I’m very proud of the fact that several people who took my class enjoyed it so much that they went on the enroll in a full-time jewellery program.  It’s equally gratifying that students from the program have joined my class and showed openness to this alternative form of jewelry making.

So… it drives me crazy when I see self-styled “instructors” churning out tutorials that teach bad technique.  Worse still is when I see a publication which positions itself as an industry leader allowing bad technique to be showcased without making the slightest effort to ensure a reasonable quality of workmanship.  It makes me want to bang my head in utter frustration.

I happened to pass by a local newsstand yesterday, and decided to stop in to see if any of the magazines I regularly peruse  were in.  I flipped through the latest issue of Step-by-Step Wire Jewelry.  SbSWJ is the only magazine since the demise of The Wire Artist Jeweller to devote itself exclusively to wirework.  In all honesty, it can only be regarded as the poor cousin of the latter.  Certainly, the projects are more simplistic – most are geared towards beginners – but to some extent I can understand that.  There is a limit to the number of steps that can be included to make each project when you’re showcasing 10+ designs an issue.

One of the projects was a neckpiece, attractive enough and easy to make.  It used square wire, also not a problem.  Here’s what made my jaw drop:  the right half of the necklace was riddled with components where the wire had gone “off square“.  What that means is that the artist did not have control of her wire.

Square wire bent around something curved like round nose pliers or a ring mandrel has a tendency to want to turn on its edge.  As a result, what you see is the corner of the wire rather than the smooth surface.  Maintaining control of the wire is vital for ensuring that the finished product looks nice, otherwise you’ve wasted your effort.  Any artist that cannot control their wire has no business trying to teach others.  It’s a waste of the students’ time.

There are a bunch of issues I see here:

First, by allowing the photo of this project with its poor workmanship to be published, SbSWJ is telling the wire community that not paying attention to the details is okay.  IT’S NOT OKAY.  Historically, it’s the lack of attention to detail that has caused the greater metalsmithing community to dismiss wirework.  Publishing crappy workmanship undermines the efforts of all of the people trying to educate the public and raise the profile of the craft.  This is a huge deal to the people who do wirework professionally.

Some might argue that they’re not interested in doing it professionally, that they are only interested in making it for themselves or as gifts for friends and family.  Okay fine.  Learning to make a piece well makes it that much more special and treasured.  It’s worth the effort.  The magazine still has a responsibility to provide the best visuals and instructions for accomplishing that goal.

Some might argue that the magazine can only work with what they’re sent.

To this I say:  BULLSH*T

I’m the editor of a magazine that publishes three issues a year.  Yes, it is difficult to deal with images that are poor quality.  But here’s the thing:  when SbSWJ published my Ladder Pendant project in March 2005, they asked me to reshoot some of the images, because the quality wasn’t good enough for print.  It is up to the magazine to set the bar and that includes setting the bar for the editorial content.  A magazine that purports to teach should at the very least START with insisting on proper technique.  Anything less does not service the readership, and people will stop buying the magazine.  Wire control is one of the fundamental techniques and SbSWJ is failing in their mandate.  Subscribers should be writing to the magazine and DEMANDING better.

As an artist, it’s a huge deal to be published.  It’s a fabulous achievement.  I still remember the high I felt being published in a major magazine for the first time.  Your work is out there, getting attention, filed in the Library of Congress, available for people to read about 5, 10, 25, 50 years from now.  So.. why would you submit something that is less than absolutely perfect? Is this really how you want posterity to see you?

As an instructor, if you can show that your workmanship is of the highest quality, being published is a stellar marketing tool.  Your tutorials will be in demand.  You’ll have repeat customers.  You’ll make more money. It’s not just about making money though, it’s about mentoring.  People just starting out want the best information available.  They want to do well, and it is the instructor’s responsibility to help them take the baby steps that builds their confidence in their abilities.  Not everyone will be able to make a virtuoso piece, but if the instructor’s work is not much better than the beginner’s first efforts, there is no chance at all for the student to develop the necessary skills to even make the attempt.

Step by Step Wire Jewelry, in its writers guidelines, states that their readers are “active amateurs and practicing professionals”.  By publishing workmanship that is blatantly unprofessional, they are not doing themselves, their contributing artists or their readers any favours; in fact, they are actively damaging the larger wire jewellery community.  They have an opportunity to take a leadership role in fostering best practices for quality.  There is no excuse for not taking it.

* Disclosure:  I am currently a member of the MAGC Board of Directors, but I do not participate in choosing who gets featured on the front page of the website.

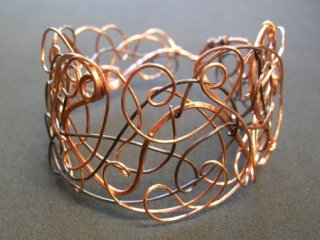
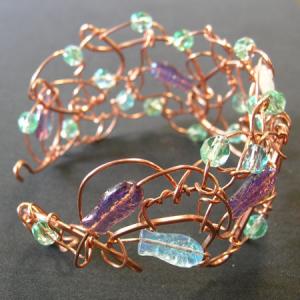
YOJ09-29 Freeform Bangle

Freeform Bangle (2009)
Copper
Constructed, cold joined, liver of sulphur patination

I’ve been in Haliburton for the last week teaching the Wire Jewellery course, so this week’s entry is one of the projects made during the week.  This is the “freeform” bangle we made on Thursday.

Week 2 and Wire Jewellery II start tomorrow.  Four of the ladies from last year have signed up again, and one from last week is in the class as well.  So there are going to be lots of familiar faces!

I’ll write more about the classes after next week when I’m home again.

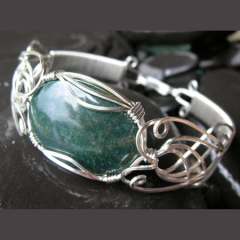
YOJ09-27 Art Nouveau Cab Bangle

Art Nouveau Cab Bangle (2009)
Sterling silver, bloodstone
L 21.5 cm x W 2.5 cm
Constructed, cold joined

Although it’s supposed to be a calming stone, I’ve always found bloodstone to have a kind of overpowering “in-your-face” energy that’s difficult to deal with.  For the last few weeks, though, I’ve been wearing it while working on my tutorials, and it’s been helpful for keeping my energy levels up and focused.  I love the red spotting on this cab, and the slight yellow cloud overlaying the green.  This was part of a group of cabs I bought when The Nautilus closed 10 years ago.  The Nautilus was *the* place in Toronto to buy rockhounding and lapidary supplies.  Located in the far, far east of the city, I remember it taking an obscenely long time to get there on city transit from where I lived in Little India.  But what a treasure trove!  The owner, Roy MacLeod, was a passionate rockhound and filled his store with all the bits and bobs needed to work with and admire rocks.  Sadly, Roy didn’t live to see the millennium, and the closing of his store left a void that still hasn’t been filled.

In designing the Level II course for Haliburton, I was thinking about what skills would be most useful for the students to learn.  In Level I, they learn the basics:  working with single wires, developing dexterity with tools, etc.  There are very few multi-wire projects.  In Level II all but two of the projects are multi-wire pieces, and the students have to deal with doing steps early on that don’t actually come into full use until much later in the construction. Wire control becomes very important.

One of the things Level II focuses on is settings:  half of the projects deal with some form of stone setting.

I think this is by far the most complex of the projects I’ll be teaching.  Hopefully by the time we get to this point in the course, the students will have enough confidence to tackle it.  If not, it’s easily adapted to something simpler.  I’ll let them decide how energetic they want to be.

This tutorial will be available for purchase and download off my website after I get back from Haliburton.  I’ll post the link when it’s up, along with more photos.

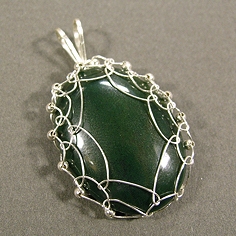
YOJ09-25 Netted Pendant

Netted Pendant (2009)
Fine silver, sterling silver
L 6.0 cm x W 2.5 cm

I’m running a bit behind with my YOJ postings, but I have been keeping up with doing the pieces.  My focus has been on preparing for my class, which starts 9 days from today!  This netted pendant is one of the projects for the class.

The good news is that I will get all of the tutorials done.  The bad news is that I have no idea if my wire is going to arrive in time!

Getting the supplies for these classes has really tested my patience. Back when I worked in the mining industry, the gentleman I worked for always reminded me to prepare for Murphy’s Law.  I’ve been reminded of that over and over in the last few weeks…

I do my best to support Canadian companies, partly because I believe in buying locally, but also because that way I don’t have to deal with the extra hassle of shipping, customs, duties and fluctuating exchange rates.

But some suppliers really make it a pain in the ass to deal with them.

Case in point:  John Bead, a trade-only wholesaler and beader’s heaven.  They would be an ideal Canadian supplier if they actually had the things I needed IN STOCK!!!  Three weeks ago I went to JB – my first visit in years – and I was reminded why I don’t bother to shop there unless I absolutely have to.  The warehouse is a frustrating jumble of aisles and bins.  Just finding things is the first challenge.  Then the flat nose pliers I wanted were out of stock.  I had to settle for a cheaper, lighter weight version.  The round nose pliers – every style – were out of stock.  The only pliers they did have in stock were their own house brand – at $20 a pop.  They didn’t have enough spools of 26 gauge copper wire, so I had to buy half of them in brass.  No 1.5 mm antique copper chain in stock.  Barely any 2 mm copper beads in stock.  This is a wholesaler, remember, with several thousand sq. feet of showroom space…

*If* they had had the pliers, I would have been well over their minimum purchase requirement.  As it was, I ended up having to visit their Swarovski room and buy a bunch of Swarovski crystals I didn’t really want or need to make up the difference.  And even there, the stock on some of the common colours was patheticly low!

So, if you’re in Canada, looking for wholesale Miyuki, Swarovski or Preciosa, John Bead is a go-to supplier if you can meet their minimum.  As for me, I think next year I’ll deal with the shipping costs, and customs charges, and just order from Rio Grande…

And increase the cost of the kit…I’m dealing with a very tight budget here, so that makes sourcing reasonably priced supplies problematic.

Thankfully, I found another supplier for the round nose pliers – Habsons Jeweller Supplies in Vancouver.  They had the quantity I needed in stock, and they had them packed and shipped the day after I ordered them.  This is the second time they’ve come through for me on a hard-to-find item.  Last year I bought a half dozen wooden ring mandrels from them – impossible to find elsewhere in Canada, but they had them.  I love these guys.  Great customer service.  Actually, maybe I’ll order from them first next year…

Next was the still-ongoing misadventure with the copper wire.

There are NO suppliers of shaped copper wire in Canada.  So, ordering from the US is required.

I placed my order in mid-June, with expected delivery in 10 business days.  The time came and went, and when I followed up this last week, I found out the supplier missed something on the paperwork.  The package had been returned and had sat in their warehouse for a week before being sent out again.  So now I’m sitting here hoping the package will arrive in the next few days.  If it’s not here by Tuesday, I have to re-order the whole lot (US$900+), and have it sent up here by express overnight courier.  Cost of the courier:  US$102.  *gloom*  And I have to re-source the cabochons because I cleaned them out of their 22×30 mm with my last order.   And then I’ll have two complete sets of the wire I need for the classes once the other order finally does arrive.  The owner is doing her best to be helpful, even taking time out of her vacation to deal with this for me.

In the meantime, I’m beavering away, working on tutorials, putting together what I can of the kits, and trying not to stress out…

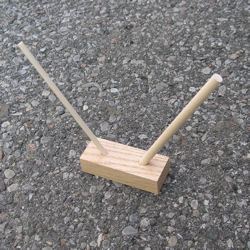
“The Vik-Knit 3000”

In preparation for my class at the Haliburton School of the Arts this summer, I asked my beloved husband to prepare some tools for the viking knitting segment.  My older son, Thumper, was very keen to help.

Thumper has recently become complete fascinated with machinery.  I’m not sure if this is a reaction to the movie “Wall-E”.  Anyways, he’s been drawing fantasy machines and coming up with all kinds of interesting names for them, most of which end in some denomination of 1000.  “This is a Cheese Grater 2000!”  “This is a Hopping Frog Truck 3000!”.

So, of course, he was very interested in what Daddy was constructing.  It’s just simple dowel holder, which gets clamped to a work surface.  Thumper decided it needed a name.  After asking what it was used for, and being told “viking knitting”, he said “Let’s call it the “Vik-Knit 3000!””

I keep trying to come up with a “Ginsu Knife” type infomercial to go with the name.  “The Vik-Knit 3000 will make your viking knitting a breeze!  Clamp it to the desk and you’re ready to go!  It will practically do the knitting for you!  But wait!  There’s more!  Order the Vik-Knit 3000 now and you’ll get two – count ’em – TWO! different sizes of dowels!”

LOL.  Anyways, it was just too cute not to share.

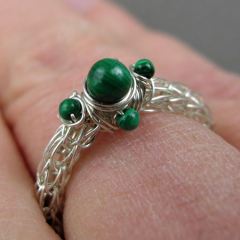
YOJ09-20 Viking Knit Ring

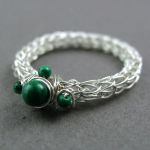
Viking Knit Ring (2009)
Fine silver, malachite, howlite
Nalbinding, single knit, constructed, cold joined

I finally got back to writing this week!  I have six tutorials to write in preparation for my class in Haliburton in July.  So far I have completed writing the draft on one of them.  Photos and actually putting the tutorials together are still outstanding.  I’m keenly aware of how quickly the time is going, so a few weeks ago I decided to put Tigger into daycare two days as week.  That is giving me several hours of uninterrupted work time, since it co-incides with the days that Thumper is in school.  What Heaven!

Usually I make the project, writing the steps as I go.  Then I put the text aside for a week or so, come back to it and reconstruct it following my instructions.  If I stumble on any part of it, that means a rewrite is in order.   Refining continues as I take the photos and do the layout.  Lots of work… which means I gotta start makin’ like a bread truck and haul buns…

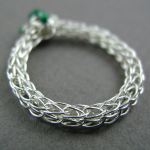
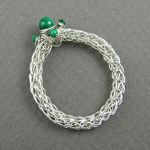
This week, I was working on instructions for viking knitting.  I experimented with incorporating 2 and 4 mm beads, which led to a screw up – err… “Design Choice” – when I went to draw the chain.  I ended up having to take the chain apart, but salvaged enough to make this ring.  It’s been an interesting experiment in timing myself as well – construction of enough chain to make a bracelet is taking a little over 2 hours.  Adding the beads was just for my amusement, and won’t be part of the final instructions.

More photos:

New Classes – Haliburton School of the Arts

I’m happy to be teaching at Haliburton School of the Arts again this summer!

Two courses are offered this year:  Wire Jewellery (July 13-17, 2009) and Wire Jewellery II (July 20-24, 2009).  Course descriptions and registration links are available on my Classes page.  Check out the Student Work from last year’s class as well!

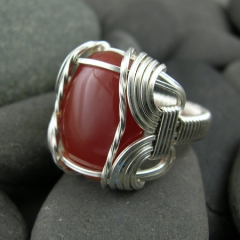
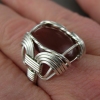
YOJ09-02 Standard Form Ring

Standard Form Ring (2009)
Sterling silver, carnelian
Size 10

I wasn’t intending to post this as my second entry for the YOJ, but it’s now Sunday, the due date for this week, and the piece I actually wanted to post isn’t finished.  I’m “tweaking”.  It feels very much like I’m doing a science experiment.

So… in the meantime…

I’m going to be teaching at Haliburton again this summer, and I have a bunch of tutorials I need to write in preparation for the class.  Last fall I proposed a second level wire jewelry course, which was accepted.  One of the projects is going to be the Standard Form Ring, aka Pharaoh’s Ring.  (Why it’s called the “Pharaoh’s Ring” is a mystery:  I haven’t been able to find any historical examples using wire.  References to cast versions, yes, wire, no…).  It’s called the “Standard Form Ring” because it’s one of the all-time classic wireworking ring patterns.  A version of this ring was published in Moods in Wire by Ellsworth Sinclair, Beginning Wirecraft by Jessie Donnan, and in the Wire Artist Jeweller Magazine (June 2003).  It’s a substantial ring, usually worn by men.  I started writing my version this week, in between printing off “printing sheets” for Number 2 Son, who likes to do “homework”.

(Edit Jun. 25/09:  Thanks to some excellent detective work by Helen Goga, a historical reference for the Standard Form Ring has been found!  Mr. Thomas Vincent Phelan received a patent for the ring design (US Des. 150,726) in August 1948.  The patent lasted for 14 years, and the design went into the public domain in 1962.)

My own personal artistic proclivities don’t lean towards classical wirework, so I haven’t made this type of ring before.  I followed the WAJ instructions for my first two attempts.  I often tell my students that they shouldn’t worry about what their first attempt looks like:  usually with the first one, you’re just trying to get your head around the steps, so clumsiness is part of the process.  It’s no different for me.  This ring was attempt number 3… and I’ll likely make at least two more in the process of refining, writing and photographing the steps for the instructions.

There are useful wireworking skills to be learned from doing this project.  There are definitely some “tricks” to getting it to look nice.  Notes are being scribbled…

Some other views:

Haliburton Class – July 21-25, 2008

JUST CONFIRMED!

I will be teaching the Wire Jewellery Course at the Haliburton School of the Arts, July 21-25, 2008. Here’s the course description from the Fleming College website:

Wire Jewellery

July 21, 2008

Course Number: ARTS0676

Section Number: 41

Please note: This course requires extensive use of hand tools (wire cutters, pliers) and a healthy level of manual dexterity. Start with the basics and learn to create and design your own jewellery using wire. Go from traditional wire wrapping techniques to original, free-form methods, or something in between. Emphasis will be based on creating pieces that reflect your individuality and personal tastes. No soldering is required and you will have the opportunity to incorporate beads, stones, and found objects to make your own unique designs. Basic hand tools and the use of some interesting tricks will enable you to continue upon completion of the course. Personal style and creativity will be encouraged in a relaxed atmosphere.

Please Note: There will be a $65 material fee payable to the instructor.

  • Welcome & Material List
Cost: $252.70
Hours: 47.50
Location: HALIBURTON
Starts: July 21, 2008
Duration: 47.50 hours
Day/Time: Monday, Tuesday, Wednesday, Thursday, Friday (09:00AM – 04:30PM)
Click for further information about Haliburton School of the Arts and to find out how to register.